Setting a magnetization configuration#
The magnetization configuration of a ferromagnet can be set in different ways. This notebook-style tutorial demonstrates the following options to set the magnetization configuration:
Setting a uniform magnetization
Setting the magnetization using a function
Using pre-defined magnetization configurations
Setting the magnetization using a numpy array
Let’s start by creating a magnet which will be used throughout this notebook.
When we use the plot_field function to visualize the magnetization configuration,
we see that the magnetization is initialized with random values.
from mumaxplus import Ferromagnet, Grid, World
from mumaxplus.util import plot_field

world = World(cellsize=(1e-9,1e-9,1e-9))
magnet = Ferromagnet(world, Grid((200,100,1)))

plot_field(magnet.magnetization, enable_quiver=False)

1. Setting a uniform magnetization#
Setting a uniform magnetization configuration is really straightforward, you just need to specify the magnetization direction using three floats:
magnet.magnetization = (1.0, 0.0, 1.0)

plot_field(magnet.magnetization)
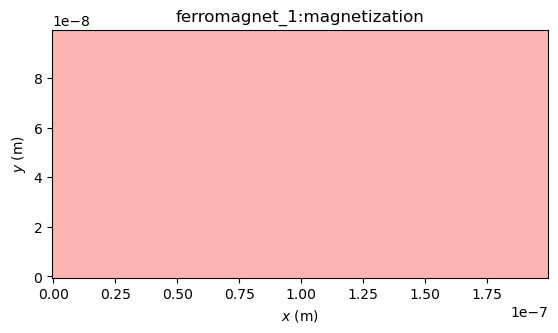
When the magnetization is set, mumax⁺ will always make sure that the magnetization field is normalized.
print(magnet.magnetization.average())
[0.7071072459220886, 0.0, 0.7071072459220886]
2. Setting the magnetization using a function#
The magnetization confugration can be set by a function. This function should take a position (x, y, and z), and output the magnetization direction for that function. When the magnetization is set equal to this function, then this function will be evaluated cell by cell to set the magnetization field.
The snippet below demonstrates how this approach can be used to initialize a helical magnetization configuration with a certain wave vector.
import math

def helical(x, y, z):
    kx, ky = 1e8, 2e8
    mx = math.cos(kx*x + ky*y)
    my = math.sin(kx*x + ky*y)
    mz = 0
    return mx, my, mz

magnet.magnetization = helical

plot_field(magnet.magnetization, arrow_size=4)

3. Using predefined magnetization configurations#
mumax⁺ comes with a number of predefined magnetization configurations. This
configurations can be found in mumaxplus.util.config.
import mumaxplus.util.config as config
Below you can find an example for each predefined magnetization configuration.
If you want to know how to use a certain configuration, you can always consult
the help, e.g:
help(config.vortex)
Help on function vortex in module mumaxplus.util.config:

vortex(position, diameter, circulation, polarization)
    Return a vortex magnetization configuration.

    Parameters
    ----------
    position: tuple of three floats
        The position of the vortex center.
    diameter: float
        The diameter of the vortex center.
    circulation: 1 or -1
        Circulation of the vortex.
    polarization: 1 or -1
        The polarization of the vortex center.
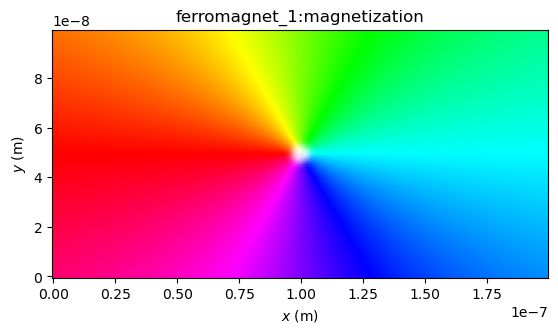
Vortex#
# magnet.center returns the (x,y,z) position of the center of the magnet
# We can use this property to position the vortex at the center of the magnet
print(magnet.center)

magnet.magnetization = config.vortex(position=magnet.center,
                                     diameter=3e-9,
                                     circulation=1,
                                     polarization=1)

plot_field(magnet.magnetization)
(9.949999935088272e-08, 4.9499998766577846e-08, 0.0)

Antivortex#
magnet.magnetization = config.antivortex(position=magnet.center,
                                         diameter=3e-9,
                                         circulation=1,
                                         polarization=1)

plot_field(magnet.magnetization)
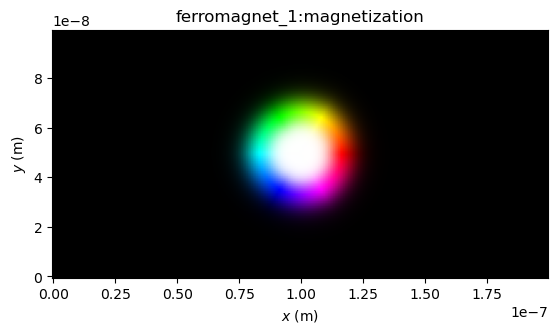
Neelskyrmion#
magnet.magnetization = config.neelskyrmion(position=magnet.center,
                                           radius=20e-9,
                                           charge=1,
                                           polarization=1)

plot_field(magnet.magnetization)
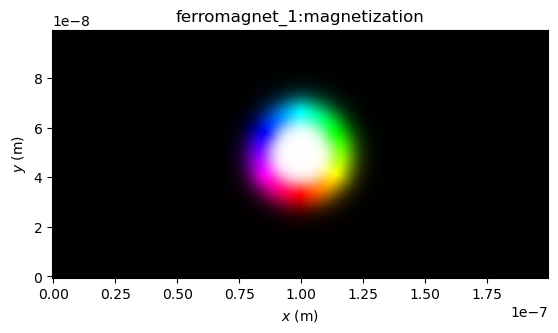
Blochskyrmion#
magnet.magnetization = config.blochskyrmion(position=magnet.center,
                                            radius=20e-9,
                                            charge=1,
                                            polarization=1)

plot_field(magnet.magnetization)
4. Setting the magnetization using a numpy array#
The magnetization configuration can also be set by a numpy array. This array should match the shape of the magnetization.
print(magnet.magnetization.shape)
(3, 1, 100, 200)
The shape of the magnetization is four dimensional with
index 0: the component
index 1: the cell index along the z direction
index 2: the cell index along the y direction
index 3: the cell index along the x direction
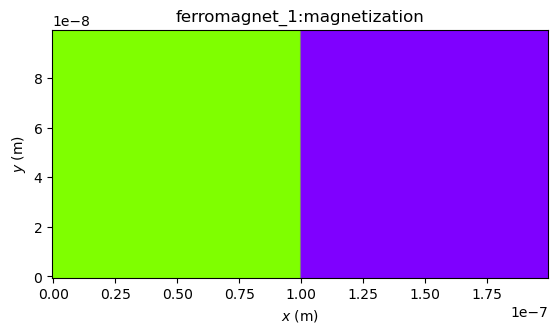
Once you understand this convention, you can use all sorts of numpy trickery to set the magnetization configuration. E.g., the snippet below shows how to set two domain state magnetization configuration using basic numpy functionalities:
import numpy as np

m = np.zeros(magnet.magnetization.shape)
m[1,:,:,0:100] = 1 # set my=1 in the left half
m[1,:,:,100:] = -1 # set my=-1 in the right half

magnet.magnetization = m

plot_field(magnet.magnetization)
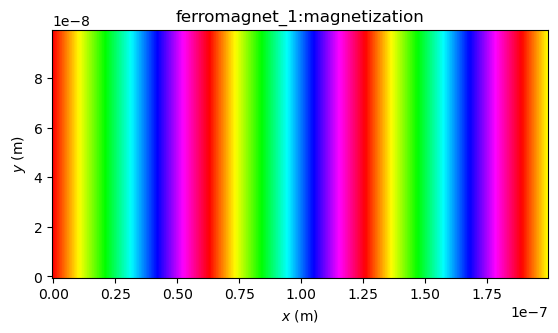
A usefull feature is the magnetization’s meshgrid which contains the spatial coordinates of all cells in a numpy array, as demonstrated in the snippet below.
m = np.zeros(magnet.magnetization.shape)

x, y, z = magnet.magnetization.meshgrid

m[0] = np.cos(1e8*x)
m[1] = np.sin(1e8*x)
m[2] = 0

magnet.magnetization = m

plot_field(magnet.magnetization, arrow_size=4)